Having a golf simulator at home is more feasible than most people think. Ask any golfer, and they’ll tell you they want one, but immediately shrug it off as if it’s the same as wishing for a Ferrari or private jet. Well, these Reddit posters ignored the critiques and presented some amazing DIY golf simulator design ideas that almost anyone can do.
Before starting your DIY golf simulator, there’s still much to consider, but these posts prove that regular people like you and me can build our own with little or no professional help. It’s time to roll up your sleeves and put some elbow grease into creating your dream DIY golf simulator, as it’s a lot more possible than a Ferrari, which can’t even hold a golf bag anyway.
Golf Simulator Coupon Codes to Help you Replicate These Builds
- ShopIndoorGolf.com: YSG5OFF for 5% off
-
PlayBetter.com: YARDSTICK250 for $250 off any studio package, YARDSTICK10 for 10% off eligible products
TABLE OF CONTENTS
Best DIY Garage Golf Simulator
Best DIY Patio Golf Simulator
Best DIY Backyard Golf Simulator
Best DIY Basement Golf Simulator
Best DIY Limited Space Golf Simulator
Another Great DIY Basement Golf Simulator
Most Economical DIY Golf Simulator
Plan Your DIY Golf Simulator Design

Best Garage DIY Golf Simulator
The DIY golf simulator showcased in this Reddit post has transformed this garage into a fully functional golf simulator with a projector, impact screen, and simulator software.
The most important aspect of recreating this simulator at home is having a garage or ample space and the necessary mounting and software components. While the project may seem achievable, it also requires a certain level of technical knowledge, some DIY skills, and dedicated time and effort.
Space Requirements
The first thing you need to consider is the space available for a golf simulator in your home. The garage in the linked post is approximately 16’ L x 15’ W x 9’ H, which is a good size for a golf simulator. A minimum space of 10’ x 10’ x 10’ is recommended for most simulators, although more space will allow for a more comfortable setup.
Technology
To recreate this golf simulator, you’ll need a golf simulator system such as TruGolf, OptiShot, or SkyTrak. These systems use infrared sensors or high-speed cameras to track your shots and provide feedback on ball flight, distance, and accuracy. A computer or tablet is required to run the software and display the simulation.
Installation
While some may prefer to hire a professional, it is possible to save money by setting up the net or enclosure, followed by the impact screen. Next, install the projector and calibrate it for optimal picture quality. Connect the sensors and install the software on your computer or tablet. Finally, attach a hitting mat, and you are ready to play.
Materials & Pricing
The cost of materials can vary depending on the quality and brand of the golf simulator system you choose. A system like this can range from $10,000 to $20,000. The projector and screen can range from $200 to $2000, depending on the size and quality. A hitting mat can cost anywhere from $50 to $750, and an enclosure or net can range from $100 to $500.
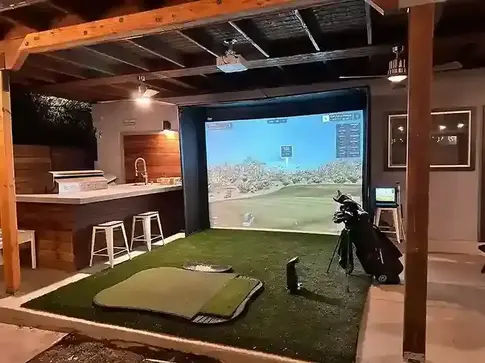
Best Patio Golf Simulator
The DIY golf simulator in this Reddit post is a fantastic example of how creative and resourceful people can be when building their own home golf simulators. The creator of this simulator used a patio space to construct their setup, which adds a unique touch to the overall project.
The simulator features a screen, projector, and mat, allowing the user to play golf outdoors. This setup requires protection from the elements when not in use, so it’s recommended that you only embark on this style if you live in a warm and predictable climate.
Space Requirements
The build process for this simulator is not explicitly stated, but it seems relatively straightforward. The user mentioned having 10’ of clearance, which is ideal. They also have additional side impact screens when beginner golfers are playing. The mat is a standard turf mat found at popular sporting goods stores.
Technology
The technology used in this simulator is relatively basic, with a projector and screen. The poster is using a Bushnell BLP launch monitor, which is compact and portable. It utilizes Doppler radar to track ball speed, launch angle, spin rate, and carry distance precisely. It also measures clubhead speed, face angle, and angle of attack to provide a complete analysis of the swing.
Installation
If you want to create a similar setup to this one, a few ideas could include using a retractable screen to use the simulator in smaller patio spaces. You also would like it to be safely protected from the house so errant shots don’t cause damage.
Materials & Pricing
The materials used in this simulator are relatively easy to acquire and affordable. The main components are the projector, impact screen, and turf mat. Other materials needed may include bungee cords, zip ties, and PVC piping for the frame, all of which can be found easily at big-box home improvement stores at a nominal price.
Best Backyard DIY Golf Simulator
The backyard golf simulator described in this Reddit post is a unique and cost-effective way to practice golf at home. It involves building a shed or enclosed space in the backyard and outfitting it with technology to create a virtual golf experience.
Creating a backyard golf simulator is a unique DIY project that can be tailored to fit individual preferences and budget. As long as you have a backyard with the right space, technology, and materials, anyone can create their own virtual golf experience in the comfort of their own property.
Space Requirements
The first step in recreating this DIY backyard golf simulator is to determine the space requirements. The shed described in the Reddit post is approximately 15’ x 10’, with 9 feet of clearance. However, this shed is much bigger to accommodate guests. This size is ideal for a medium-sized backyard and allows for enough space to swing a club without hitting the walls. The size of the space can be adjusted based on the size of the backyard and personal preferences.
Technology
The Reddit post describes using a GSPro software. The GSPro golf simulator software is designed to provide accurate and realistic gameplay for golfers of all skill levels. The software uses advanced ball flight tracking technology, similar to the one used in professional golf tournaments, to accurately measure every shot’s speed, trajectory, and spin rates.
Installation
The shed or enclosed space can be built using basic tools and materials like wood, insulation, and drywall. A hitting mat or turf should be placed to protect the floor and clubs. This type of setup is more elaborate, and unless you’re handy with tools, professional assistance may be required, especially if building in colder climates.
Materials & Pricing
As mentioned, building materials such as wood, insulation, and drywall will be needed to create the shed or enclosed space. The cost of building a backyard golf simulator will vary depending on the materials and technology used. For the basic setup described in the Reddit post, the cost could range from $10,000 to $20,000. However, the cost could be significantly higher for a more advanced setup.

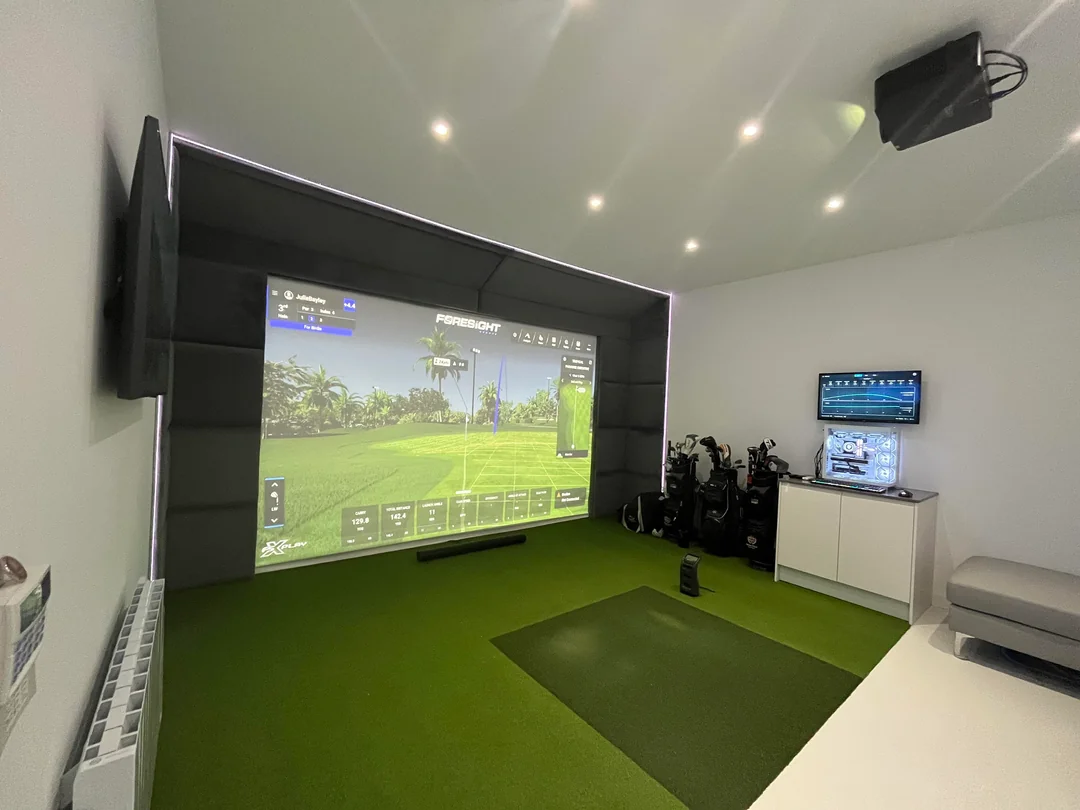
Best Basement Golf Simulator
The golf simulator described in this Reddit post is a simple set-up with a hitting area, a screen, a projector, and a small seating area for players and guests. The hitting area is large enough to accommodate a full swing while onlookers remain at a safe distance. Without height restrictions, a basement DIY golf simulator is one of the easiest to create.
Space Requirements
To build a similar golf simulator set-up, you will need a dedicated space in your basement that is at least 10 feet wide, 10 feet long, and 10 feet high. This space will be used to set up your hitting area, screen, and projector. Consider the surrounding space to ensure enough room for the ball to travel without hitting any objects, and consider whether you want to include a similar seating area; this one has a 22’ distance.
Technology
The poster has installed the Foresight Falcon golf simulator software, which is ideal for DIY basement golf simulators due to its user-friendly features and advanced simulation capabilities. It uses powerful algorithms and high-speed cameras to accurately track and replicate the golf ball’s flight, providing a true-to-life experience of playing on a real golf course.
Installation
The first step in installing a basement golf simulator is setting up the hitting area. This can be done by building a hitting mat using outdoor carpet or turf and plywood. The screen should be placed at least 5 feet behind the hitting mat. Once the screen is set up, mount the projector on the ceiling or a sturdy stand, ensuring it is positioned correctly to display on the screen. Lastly, the projector is connected to the computer and calibrated to display the simulation correctly on the screen.
Materials & Pricing
A complete at-home golf simulator kit is a one-stop shop for this setup style. It’s easier than buying all the components separately, and getting the correct measurements is vital for this setup. Full kits come in all shapes and sizes to suit any budget, ranging from $5000 to $20,000+. The sky’s the limit.

Best Golf Simulator for Limited Space
Making use of limited space is challenging with something as large as a golf simulator, but for those brave enough and with the right amount of experience, creating a DIY golf simulator for a small space is possible. In this case, the poster has figured out a way to preserve his small space while also having a golf simulator by hiding it in the wall.
This project is not for the faint of heart, but if you have some serious DIY skills, it’s one of the best DIY golf simulator design ideas out there.
Space Requirements
Despite the golf simulator being hidden, the space required doesn’t change from that of a standard simulator once the hitting stall is deployed. The poster mentions it’s 12′ x 15′, but if built in a smaller space, the minimum space required is 10’ x 10’. Limited space sometimes means limited height, so ensure your space has at least 9’ of clearance, depending on how tall the users will be.
Technology
The poster is very detailed and has thankfully provided all his specs. He has chosen to operate with a ProteeVX Launch Monitor, GSPro, and TGC2019 Software. One of the most significant advantages of the ProteeVX Launch Monitor is its versatility. It can be used with a variety of golf simulator software, so users aren’t tied to one list of courses and practice features.
Installation
The Reddit post describes a “hideaway” golf simulator, meaning it can be folded up and out of sight when it is not in use. This makes it a great option for people with limited garage space but adds a new wrinkle to the installation process. The key here is measuring the hitting area precisely to fit in the designated space once folded. The rest, projector, launch monitor, impact screen, etc., are installed just like any other DIY golf simulator.
Materials & Pricing
The biggest expense with this project is the material used for the flooring, which will also be folded up into its retracted position. The poster used plywood and glue to balance stability and lightweight, making it easy for anyone to retract. Other than the slightly added expense of building a floor instead of laying down a mat, the price is even higher if you include the dual software package utilized in this setup as well.

Alternative Basement DIY Golf Simulator
This Reddit post provides another fantastic DIY golf simulator design idea, complete with a guide on how to build a similar simulator at home. It includes information on space requirements, technology, materials, and installation process. Following this guide makes it easier to create a home golf simulator and enjoy golf anytime, regardless of the weather.
Space Requirements
As one of the most crucial steps to any golf simulator, determining the space required is paramount. As mentioned, the minimum recommended space for a full-swing simulator is 10’ x 10’ x 10’. This poster’s height is only 9’, showing that it can be done with less if no tall people will be using it.
Technology
The Reddit post recommends using a high-speed camera-based system for the simulator, which is excellent for indoor use. This technology captures the swing and translates it into an accurate representation on the screen. The post also mentions using golf simulation software such as E6 Connect to create a realistic golfing experience, but as we know, this is subjective, and choosing your own software will be based on your specific needs.
Installation
The first step in the installation process is to build the simulator’s frame. The Reddit post suggests using PVC pipes and connectors to create the frame, as they are lightweight, affordable, and easy to work with. The post recommends using blackout cloth for the screen and mounting it to a wooden frame for the next step. Finally, the high-speed camera and launch monitor should be set up according to the manufacturer’s instructions.
Materials & Pricing
The materials used in this post are common except for the spackling, which they chose for aesthetic pleasure. Of course, that is an add-on and not required to enjoy a DIY home golf simulator. Like any simulator, you need the basics of technology, budget permitting, and the necessary space. This poster says they spent $10,000, a good budget to create any quality DIY golf simulator.

Most Economical DIY Golf Simulator
This Reddit post details how the user was able to build their own affordable golf simulator for only $3,000! This type of DIY project requires a combination of technical skills, knowledge of golf and golf simulators, and access to affordable materials. Having a space for the simulator already in place also saves a lot of money.
Space Requirements
Unfortunately, there’s no skimping on the space required; this remains 10’ x 10’ x 10’ to be safe. The poster has used what looks to be a garage with a vaulted ceiling, which is ideal for a DIY golf simulator. Indoor space is always preferred to preserve the technical components, but outdoor simulators are an option if no indoor space is available.
Technology
The technology used in this DIY project includes a projector, a tracking system, and a computer. The user in the Reddit post used an Epson 3800 Home cinema projector, which can be found for around $1500. For the tracking system, they used the Garmin R10, priced at $500. This system allows for accurate measurement of ball flight and game analysis. Lastly, the user used a laptop computer to run the simulator software and connect to the projector, saving a lot of money.
Installation
The key to a successful installation is proper set-up and positioning of the projector and the tracking system. Doing this all yourself saves money, and this poster seems to have done it. The projector still needs to be positioned to project the image onto a flat surface. The tracking system should still be set up at the appropriate distance, and the sensors of the tracking system still need to be correctly aligned and calibrated for optimal performance, as if a professional calibrated them.
Materials & Pricing
You only need a few essential materials to create this DIY golf simulator. These include a net or a projector screen ($50-100), netting material, such as mesh fabric or batting cage netting ($200-300), a projector mount ($50-100), a hitting mat ($75-100), and a turf mat ($75-100) for a more realistic experience. Additionally, you will need some basic tools, such as a screwdriver, measuring tape, and a level for installation. Borrowing tools and comparing prices will take time but will lower the overall cost considerably.
Plan Your DIY Golf Simulator Design
The first and most important step before breaking ground is creating a detailed plan that incorporates all your DIY golf simulator design ideas. Use these guides to start developing your plan, timeline, and budget so that when you’re done, you can enjoy golf at home anytime you like.
-
How to Build a DIY Home Golf Simulator
-
Top Golf Simulator Screens & Enclosures
-
Get the Best Golf Simulator Software
Thanks for reading – you may also enjoy our Weekly Newsletter:

This website is a participant in the Amazon Services LLC Associates Program, an affiliate advertising program designed to provide a way for websites to earn advertising revenues by advertising and linking to Amazon.com. Some of the links on this page are affiliate links. This means that, at zero cost to you, I will earn an affiliate commission if you click through the link and finalize a purchase.