How to Mount a Golf Simulator Projector: A Step-by-Step Guide
Are you a golf enthusiast looking for the perfect way to practice your game? Look no further than a golf simulator projector! With a golf simulator projector, you can design your own golf course, practice your swing, and even play a round of golf with friends - all in the comfort of your own home. In this article, we'll walk you through the steps of mounting a home golf simulator projector and explain the benefits of having one. So if you're ready to take your golf game to the next level, keep reading!
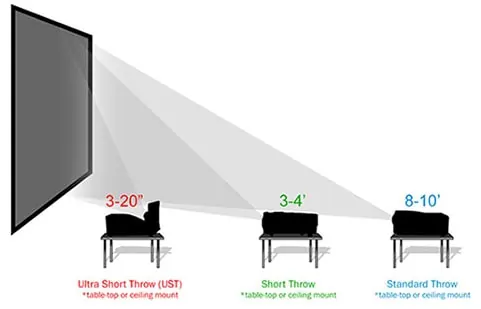
How Projector Throw Ratio Impacts Projector Placement
When mounting a golf simulator projector, it is important to consider the projector throw ratio. This ratio is determined by the distance between the projector and the screen divided by the width of the image projected. Knowing this ratio is important because it will determine how far away the projector must be from the screen. Placing the projector too close to the wall will produce an image that is too large. If it is placed too far away, it will produce an image that is too small. It is essential to find the optimal projector throw ratio that will produce a high-quality image to ensure the best golf simulator experience.
While mounting a golf simulator projector, it is important to consider the projector throw ratio. This ratio will determine how far away the projector must be from the wall or screen in order to produce an image of a specific size. To learn more, see our golf simulator projector calculator.
While mounting a golf simulator projector, it is important to consider the projector throw ratio. This ratio will determine how far away the projector must be from the wall or screen in order to produce an image of a specific size. To learn more, see our golf simulator projector calculator.
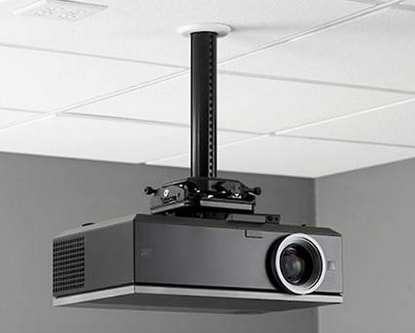
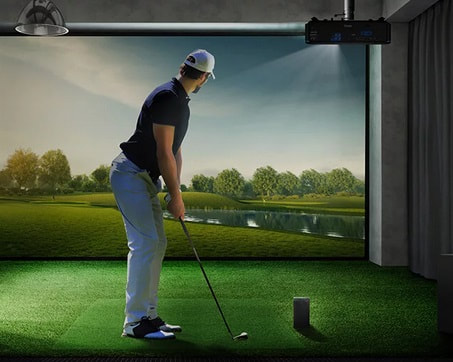
Above Central Projector Placement
Mounting a golf simulator projector is becoming increasingly popular as it provides many advantages to the user. By mounting the projector, users are able to create a central focal point for their golf simulator and get a clear, full display of the projected image. This also makes it much easier to maintain a consistent and optimal viewing angle, as well as creating a more professional, modern look.
In addition to being aesthetically pleasing, mounting a projector also offers more flexibility in positioning the simulator's components. It also offers better illumination of the area, which can help with accuracy and performance for the user. Furthermore, it reduces the chances of any golf simulator projector shadow or glare. Lastly, it is easy to adjust the projector's height and orientation for better image clarity.
All in all, mounting a golf simulator projector offers many advantages to the user, making it a popular choice for those who are looking to get the most out of their simulator. With the enhanced clarity and improved illumination, users can be confident that they will be able to get the most out of their simulator experience. With an above placement, do your best not to create an obstruction in the hitting area and interfere with players swinging clubs.
Above and Off Center Projector Placement
Mounting a golf simulator projector is an important part of getting the best image quality possible. Above and off center projector placement is an ideal way to mount the projector because it gives the projector an unobstructed view of the screen, meaning a clearer and more accurate image. This placement also prevents the projector from being in direct line of sight of the ball, which could potentially damage the projector.
Above and off center projector placement also makes it easier to adjust the projector to the ideal angle in order to get the best image quality. Having the projector in this position prevents any potential golf simulator projector shadow, allowing for more flexibility when it comes to adjusting the projector height and distance from the simulator for the best image quality. Off center placement also allows for more room in the hitting area.
By taking the time to mount the projector in the ideal position, golfers can be sure that they are getting the best image quality for their simulator. With the right projector placement, golfers can be sure that their simulator will be as accurate as possible and that their projector will be safe from any potential harm.
Side Mounted Projector Placement
Golf simulators are a great way to practice and enjoy the game of golf, even when you can't get out on the course. To get the most out of your golf simulator, however, you need to make sure that your projector is properly mounted. One of the most popular mounting options for golf simulators is side mounting.
Side mount projector placement is most often used in golf simulators, as the projector is placed off to the side of the golf simulator, rather than directly in front of the golfer. This placement option provides the golfer with a larger and more realistic field of view, as the projector is not directly in front of the golfer. Mounting the projector on the side results in a more even display of the image. This is because the projector isn't directly in front of the golfer, allowing them to move around freely without disrupting the image.
This placement option is also ideal for taller players, as the projector is placed higher up, allowing for more space for the golfer to swing without hitting the projector. Side mounted projector placement also requires less maintenance, as the projector is placed out of the way, and will not be directly exposed to dust and dirt.
With all of the advantages that side mounted projector placement offers, it is no surprise that it is a preferred mounting option for golf simulators. By properly mounting the projector, you can get the most out of your golf simulator, and have a realistic and enjoyable experience.
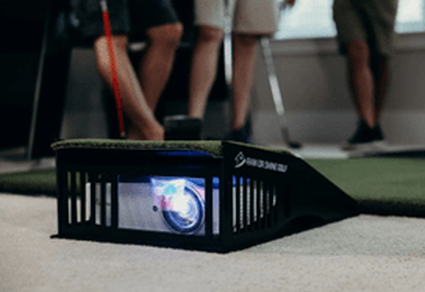
Floor Mounted Projector Placement
For avid golfers, a golf simulator is the perfect way to practice their swing and improve their game. But to make the most of a golf simulator experience, it’s important to ensure the projector used is mounted correctly. Floor-mounted projectors are the ideal choice for golf simulator installations as they provide the best possible performance and image quality.
Floor-mounted projectors can be easily adjusted and moved to the desired height and angle for optimal viewing. They also can be easily stored away when not in use, allowing for more space in the area. Additionally, floor-mounted projectors are more difficult to steal or tamper with, making them safer than wall-mounted projectors.
Floor-mounted projectors can be used in a variety of locations, including outdoors or in a dedicated golf simulator room. This is especially beneficial for golfers who want the option to move the projector from one place to another. Floor-mounted projectors can be easily moved if desired, allowing you to change your setup or move the projector to a different location.
Overall, floor-mounted projectors are the ideal choice for golf simulator installations due to their performance, image quality, and versatility. With a floor-mounted projector, golfers can be sure they’re getting the most out of their golf simulator experience.
No Projector
The popularity of projector-free golf simulators is on the rise. Without the need for a projector and screen, golfers have more flexibility when it comes to placement and budget. Without a projector, the monitor or television can be placed anywhere in the room, allowing for more creative design possibilities. This eliminates the need for a large projector setup, saving golfers both time and money.
The projector-free option also allows for a more immersive experience. Since the golf simulator can be placed closer to the player, it’s easier to focus on the game. Additionally, you can also use a larger monitor or television, allowing for a more realistic golf experience.
Overall, projector-free golf simulators are a great choice for those looking for a more flexible and budget-friendly solution. The lack of a projector also allows for more design possibilities and a more immersive experience. If you’re looking for a golf simulator, consider a projector-free option for the best experience.
How to Set Up a Golf Simulator Projector
Mounting a golf simulator projector typically involves several steps, which may vary depending on the specific equipment and setup you have. For example, location may vary between a short throw and ultra-short-throw projector. Here are some general steps you can follow:
- Choose the location: Select a location that has enough space for the golf simulator screen and projector, as well as adequate ceiling height and lighting. Ideally, the location should be free from any obstructions or obstacles that could interfere with the projection.
- Determine the projector location: Decide on the best location to mount the projector. This may depend on the size of the room, the distance from the screen, and the projection angle required.
- Install mounting hardware: Install the mounting hardware that came with your projector. This typically includes brackets, screws, and a ceiling mount.
- Mount the projector: Attach the projector to the mounting hardware, making sure that it is securely fastened and level.
- Connect the projector: Connect the projector to your computer or golf simulator device using an HDMI cable or other appropriate connector. Test the connection to ensure that the image is clear and the resolution is appropriate for your needs.
- Adjust the projection: Adjust the projection to optimize the image quality and alignment with the screen. This may involve adjusting the zoom, focus, and keystone correction settings.
- Secure the cables: Secure all cables and cords to avoid tripping hazards and prevent damage to the equipment.
- Test the setup: Test the golf simulator to ensure that everything is working properly. This may involve hitting a few shots and checking the accuracy of the ball tracking.
- Fine-tune the setup: Fine-tune the projector and screen settings as needed to achieve the best possible image quality and accuracy.
Keystone Correction
When mounting a golf simulator projector, one of the most important features to consider is keystone correction. Keystone correction is a feature that allows you to correct the shape of the projected image when it is mounted at an angle. This is beneficial for golf simulator projectors, as the way the projector is mounted affects the accuracy of the game. Keystone correction makes it easier to get a more accurate projection of the golf course, allowing you to play more accurately.
Keystone correction also allows you to adjust the image size and shape to better fit the size of the screen or wall you're projecting on. This can be especially helpful if you want to adjust the aspect ratio of the projected image, which can make a big difference in the visual quality of the game. Keystone correction is a valuable tool that lets you get the most accurate projection possible, and it can make a huge difference in the quality of your golf simulator experience.
Keystone correction also allows you to adjust the image size and shape to better fit the size of the screen or wall you're projecting on. This can be especially helpful if you want to adjust the aspect ratio of the projected image, which can make a big difference in the visual quality of the game. Keystone correction is a valuable tool that lets you get the most accurate projection possible, and it can make a huge difference in the quality of your golf simulator experience.
Zoom Lensing
Mounting a golf simulator projector can be a tricky task. Fortunately, many modern projectors come equipped with zoom lensing, a feature that can make the whole process much simpler. Zoom lensing allows the projector to be mounted farther away from the screen while still displaying a clear image, helping to minimize the amount of keystoning that is necessary to get the image properly aligned. Zoom lensing can also help to reduce projector noise, since the projector can be set back further from the audience.
Additionally, zoom lensing allows for a greater range of projector distance from the screen, so the projector can be placed in more creative or convenient locations. Zoom lensing also gives the projector more flexibility when it comes to mounting heights, since the lens can be adjusted to fit the space.
All of these features make zoom lensing particularly beneficial for home golf simulator setups. It allows the projector to be mounted farther away from the player, reducing glare and making it easier to see the image. With the help of zoom lensing, mounting a golf simulator projector can be a much simpler and more successful task.
Lens Shift
Lens shift is a feature available in some projectors that allows the lens to be adjusted vertically or horizontally without physically moving the projector. This means that the projected image can be moved up, down, left, or right within the projector's throw range, without having to physically adjust the projector's position.
Lens shift is typically controlled through a set of adjustment knobs or buttons on the projector or remote control. By adjusting the lens shift, you can position the projected image precisely where you want it, without having to worry about the projector's placement.
Lens shift is especially useful when setting up a projector in a fixed location, such as a home theater or conference room. It allows you to adjust the projected image to fit the screen or wall, without having to reposition the projector or compromise the image quality.
It is important to note that not all projectors have lens shift, and those that do may have different ranges of adjustment. When choosing a projector, consider whether lens shift is a feature you need and what range of adjustment you require for your particular setup.
What If the Projector is Too Close to the Impact Screen?
If the projector is too close to the impact screen, it can also generate too much heat, causing the impact screen to warp or even melt. Taking the time to properly mount the projector can help ensure the best image quality and protect the projector from damage.
When it comes to mounting a golf simulator projector, it is important to consider several factors to ensure the best image quality and to protect the projector from damage. The projector must be mounted at the correct distance from the screen in order to avoid a “hot spotting” effect, in which the image is distorted and slightly blurry.
The projector should also be positioned to avoid light reflecting off of other objects in the room, including walls and furniture, which can cause a glare. Additionally, the projector should be positioned far enough away from the impact screen to avoid the “keystoning” effect, which is when the image is distorted and not straight.
What If the Projector is Too Far Away from the Impact Screen?
Mounting a golf simulator projector can provide an immersive gaming experience, but it can be difficult to get the right distance between the projector and the impact screen. Fortunately, there are a few options available to help you achieve the perfect setup.
Moving the projector closer to the screen could be one solution, but reducing the throw ratio of the projector and adjusting the zoom settings can also be potential fixes. If the space allows it, using a longer HDMI or VGA cable can be an option. Utilizing a short-throw projector could be an effective way to reduce the distance between the projector and the impact screen.
Lastly, consider investing in a projector mount to help make the necessary adjustments. With the right setup, you can enjoy a realistic and immersive golf experience.
How do I Avoid Damaging My Golf Simulator Projector?
Mounting a golf simulator projector is an important step in setting up your home simulator. To ensure the best experience, it’s important to mount the projector securely and properly. The first step is to purchase an appropriate mounting bracket that is compatible with your projector.
Make sure to keep the projector away from direct sunlight to avoid overheating, and use a surge protector to protect the projector from power surges and outages. It’s also important to keep the projector away from water or other liquids to avoid water damage.
Regularly cleaning the projector lens is also important to avoid dust buildup. Investing in a projector enclosure can also be beneficial to protect the projector from the elements. Avoid moving the projector too often as this can cause wear and tear on the device. By following these steps, you can ensure that your golf simulator projector is properly mounted and protected from potential damage.
Are There Any Safety Considerations to Keep In Mind When Mounting a Projector?
When mounting a golf simulator projector, it is important to ensure a secure and safe installation. The ceiling or wall used to mount the projector should be strong enough to support the weight of the projector. Additionally, any combustible materials should be kept away from the projector to avoid potential fire hazards.
It is also important to make sure the projector is securely and level mounted. This ensures that the image is projected correctly and does not become distorted. Additionally, the projector should be at least 6 feet away from any people or objects to avoid potential injuries or damage to the projector.
Following these steps will help ensure a safe and secure installation for your golf simulator projector.

