How to Create a Divot Action Golf Hitting Strip
Hitting golf balls off a mat is a very common method of practice. The more the golf mat is able to simulate real turf, the better. Getting a mat to replicate the feel of taking a divot is the holy grail when it comes to golf mats. We are going to explain how to build a divot action golf hitting strip that you can use with your golf simulator. The divot action simulator can be built in one afternoon and can be inserted directly into a larger golf-hitting mat. We'll take you step-by-step through the process of building the mat and share some pictures along the way.
Material Used and Products Purchased
As you start to gather material for the build, keep in mind that the quality of the material purchased will have an impact on the overall quality of the build. If you use cheap synthetic grass versus a hitting mat, you may be replacing the turn more frequently. For this build, we are going to use the following:
- Polycarbonate: A sheet of polycarbonate that is cut to 18 inches by 36 inches. You will be looking for material that is about 0.25 inches thick. You want it to be strong, yet have some give to create the divot action. I suggested 36 inches so you can have 18 inches behind and 18 inches in front of the ball. I suggest having a good length behind the ball so golfers do not hit the back of the polycarbonate and shatter it. You may see this listed as Lexan at your hardware store or online. Lexan is simply a brand name for polycarbonate.
- Artificial turf: Get a good quality artificial turf that will let the ball sit up slightly to simulate grass. Purchase more turf than you need so you are ready with a replacement when the turf wears out.
- Foam Padding: The foam padding will need to have some give to it in order to create the divot action. I build mine by cutting strips off old interlocking EVA foam padding we used in a playroom when the kids were little. You will want enough padding to put a 2-3 inch strip at each of the 18-inch ends and a couple 2-3 inch strips along some of the length of the of the polycarbonate.
- Construction Adhesive of Double-Sided Carpet Tape: You will use this to adhere the turf to the polycarbonate. Using double-sided tape makes it easier to replace the turf, but also has a bit more risk of the turf coming loose. The choice is yours to make.
Assembling the Divot Action Mat
Now we get to the meat of the topic on how to build a divot action golf hitting strip. For this set of instructions, I will assume that you have not cut the polycarbonate or the artificial turf to size.
To achieve the best result, it is important to pay attention to the instructions and carefully follow them in the order they are presented. This may involve gathering the necessary materials and tools, understanding any safety precautions that need to be taken, and taking the time to carefully execute each step as described.
It may also be helpful to read through the entire set of steps before beginning, so that you have a clear understanding of the overall process and what to expect. By paying attention to detail and taking the time to carefully follow each step, you will end up with the best possible divot action hitting strip.
Step 1 - Cut Your Materials
Polycarbonate is a tough and durable plastic material that can be challenging to cut, here are a few tips for cutting it (alternatively you can order material cut to the size you want):
Cut the artificial turf to size using either a pair of sharp, heavy-duty scissors or carpet cutting knife. Use a straight edge to mark your cutting lines on the back of the turf. I've found that a silver Sharpie or chalk tends to show up well against the black backing of the turf. When cutting artificial grass, always make your cuts with the roll upside down. This allows you to follow the lines you’ve already marked; it also aids in following the stitch rows and the natural grain of the fabric as evenly as possible.
- Measure carefully to ensure your cuts are in the correct position. Leave the protective film in place and stick some masking tape where the cutting line will be. Mark the cutting line on the masking tape.
- Use a fine-toothed saw to cut the material. Fine tooth hollow ground blades and triple chip carbide blades are the best choices for producing a good quality finish. A fine-toothed saw, such as a handsaw, jigsaw, or circular saw with a fine-toothed blade will allow you to make clean cuts without shattering. Use a slow and steady motion to make the cut, and be sure to wear protective eyewear to protect your eyes from any debris.
Cut the artificial turf to size using either a pair of sharp, heavy-duty scissors or carpet cutting knife. Use a straight edge to mark your cutting lines on the back of the turf. I've found that a silver Sharpie or chalk tends to show up well against the black backing of the turf. When cutting artificial grass, always make your cuts with the roll upside down. This allows you to follow the lines you’ve already marked; it also aids in following the stitch rows and the natural grain of the fabric as evenly as possible.
Step 2 - Attach the Turf
With both the polycarbonate and artificial turf measured and cut to size, it is time to attach the turf.
Lay the poly down flat on the floor and remove one side of the backing off a bit of the double sided tape. Stick the tape to the edge of the poly. Making sure it is secure as you go, continue to roll out and remove the backing from the tape along one of the long edges of the poly. Repeat this process several times, allowing only a small gap between each row to ensure the maximum surface area for adhesion to the turf.
Once all the rows are in place, remove the backing on the upside of the tape. Now, carefully align the edges of the turf to the edges of the poly and lightly connect the two. If you are comfortable that they are aligned, press the turf firmly into the tape all along the edges and throughout the turf. take your time so as not to get any wrinkles in the turf.
Alternatively, you can liberally apply the construction adhesive to the poly instead of using double sided carpet tape. In this case, apply the adhesive in a continuous bead starting at the edge and working your way across the material in several large "U" shaped patterns. Again you align the edges carefully and press the turf to the poly.
In both cases you may want to give the tape or adhesive time to bond before hitting shots. Feedback from friends indicated placing a heavy object on the turn assisted in the bonding process.
Step 3 - Attaching the Foam
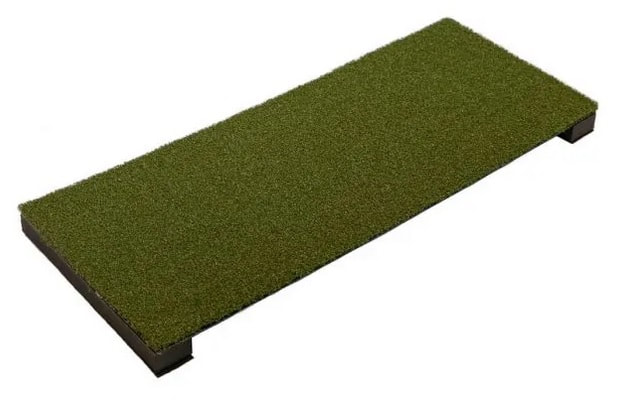
The combination of the poly flex and the foam is what creates the divot action. In this step we will be attaching the foam to the golf hitting strip. Begin by placing the strip turf side down, exposing the underside of the poly. I have seen foam pads between 1/2 inch and 2 inches used for this sort of application. A quick tip before we begin is to decide if your hitting strip will be embedded in a larger golf hitting mat or if it will be used alone. If you are embedding it, you'll want to carefully match the thickness of the larger mat so you do not create an edge that your club might catch during a swing.
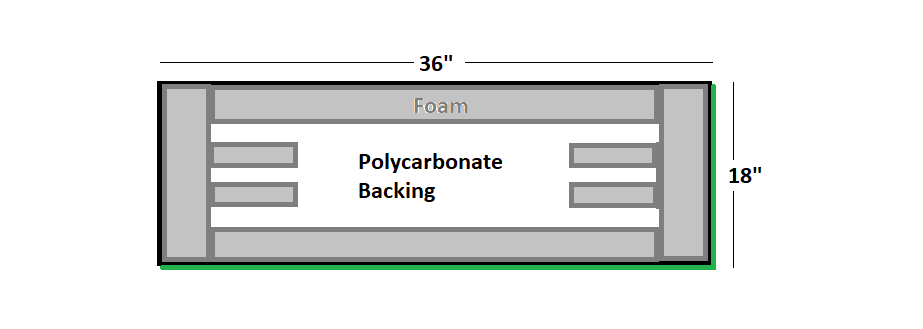
Begin by attaching the foam to the two short ends of the hitting strip. You'll want the foam to be almost up to the very edge. Leave 1/16 to 1/8 inch from the short edge of the strip so you can more easily embed it in a larger hitting mat. You can cut the foam to the full width of the hitting strip, but no larger as you do not want the foam to extend beyond the strip. The foam may have an adhesive backing or you may want to use construction adhesive.
With the front and back foam in place, you may want to experiment a bit on where the rest of the foam resides. At 18 inches wide, you'll want 3 to 4 foam strips that run the length of the hitting strip. I've found running four foam pads the full length of the hitting strip was a bit too firm for me. My preferred method is to run foam the full length along the edges and to have two shorter pieces with a gap in the middle at each end (see the graphic below).
Final Thoughts on the Divot Action Hitting Strip
Don't be afraid to experiment with different configurations to get the best result for your golf training mat. You may want to adjust the foam placement to change the amount of flex from the hitting strip. You may also want to leave a gap in the length if you are embedding this in a larger hitting mat to allow it to slide and feel even more like a divot.
Now that you know how to quickly make a new strip, you can try a number of them and see what works best for you. I think you'll find that the strip reduces the stress on your wrists and elbows and feels a bit more like a real golf shot. It was surprising to me how well this felt when compares to hitting off my Fiberbuilt mat.
Now that you know how to quickly make a new strip, you can try a number of them and see what works best for you. I think you'll find that the strip reduces the stress on your wrists and elbows and feels a bit more like a real golf shot. It was surprising to me how well this felt when compares to hitting off my Fiberbuilt mat.

